ShopDreamUp AI ArtDreamUp
Deviation Actions

It is a bittersweet feeling to be talking about this because this is how I first started the world of photography 4 years ago this past August. I arrived at photo class in my sophomore year in high school and the first lesson was pinhole cameras. To my surprise I could make my own camera and develop the prints in the darkroom with out even using a real camera, but one made out of an oatmeal container.
Basic Parts and Functions of a Pinhole Camera
Materials for Pinhole Camera
 light tight container with opening (like an oatmeal container) can by cylinder, rectangular, etc.
black paint/paper
empty soda can
push pin
changing bag / darkroom
photographic paper (usually b&w)
darkroom access (for use of chemicals)
Making the pinhole is easy... First, you take your light tight box, cylinder, etc. and paint the inside black or cover it up with black paper so that it helps keep the inside 100% light tight. Also, at this time keep one opening as the door and then completely seal any other openings. Then you need to make the pinhole by cutting a 1" X 1" square (2.54cm X 2.54cm square) off of the soda can and then carefully pierce the center with a push pin. In order to find the center lightly draw an X on the piece of aluminum. Finally sand both sides until it's smooth and clean out the dust particles. Now you need to place this on the light tight object you are using for the camera body. Cut a .5" X .5" (1.27cm X 1.27cm) on the body and then place the aluminum onto the container from the inside and that the pin hole lines up within the center of the hole that was cut. Lastly, create some type of shutter by placing a piece of tape over the pin hole or creating some type of card that can slide over it and off of it to make the exposure.
The pinhole camera is finally complete.
You then would normally do a light-leak test to see if the camera is 100% light tight inside by placing a small piece of photo paper into the camera within a changing bag or darkroom. Then bring it back into the light for a few minutes then go to a darkroom and develop. If it's black or has any variations of black/grey there's a light leak and may ruin a photo if you try to take a picture with it. To fix it, just try to find it yourself and cover it up, then try again.
Last, but not least, you place photo paper directly across from the lens and then will need to make a reasonably long exposure. The outcome of a pinhole image will be a negative and to make the positive, you just contact print it using an enlarger within a darkroom; this is why some pinhole images look the opposite of what something really is, which is similar to what the negative does in a film camera. See below:
negative -->
 <-- positive
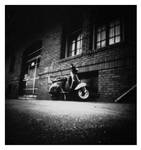
There are also different techniques with this process as you can experiment with different pinhole sizes, multiple exposures, angles, ghost exposures, etc. Even instead of using paper, you can use films. With recent advancements, it is possible to use pinhole even for digital slr cameras by drilling a hole into the lens cap and making a lengthy exposure. You're limitless in the world of pinhole photography; in fact, you're limitless in the world of photography in general.")
Awesome pinhole photography


:thumb6975885:


:thumb17222499: :thumb4825788:
:thumb38361120: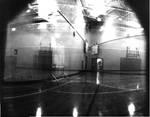


 :thumb34974138:


Want to learn more?
 Pinhole Photography
Worldwide Pinhole Photography Day
The Pinhole Gallery
Pinhole Visions
Basic Parts and Functions of a Pinhole Camera
1. Body- light tight bow which holds the light-sensitive photo paper
2. Lens (pinhole)- focuses rays of light from the subject to produce an image onto the photo paper
3. Aperture- the size of the lens opening
---->small- less light enters (long exposure time & sharper image)
---->large- more light enters (shorter exposure time & fuzzy image)
4. Shutter- device that controls when the light enters the lens
5. Focal length- the distance between the lens and the focal plane
---->longer- telescope effect (subject appears larger in the image)
---->shorter- wide-angle effect (subject appears smaller)
6. Focal plane- located directly across from the lens (where photo paper goes)
7. Door- opens and closes camera body when placing photo paper in or taking photo paper out.
Materials for Pinhole Camera
Making the pinhole is easy... First, you take your light tight box, cylinder, etc. and paint the inside black or cover it up with black paper so that it helps keep the inside 100% light tight. Also, at this time keep one opening as the door and then completely seal any other openings. Then you need to make the pinhole by cutting a 1" X 1" square (2.54cm X 2.54cm square) off of the soda can and then carefully pierce the center with a push pin. In order to find the center lightly draw an X on the piece of aluminum. Finally sand both sides until it's smooth and clean out the dust particles. Now you need to place this on the light tight object you are using for the camera body. Cut a .5" X .5" (1.27cm X 1.27cm) on the body and then place the aluminum onto the container from the inside and that the pin hole lines up within the center of the hole that was cut. Lastly, create some type of shutter by placing a piece of tape over the pin hole or creating some type of card that can slide over it and off of it to make the exposure.
The pinhole camera is finally complete.
You then would normally do a light-leak test to see if the camera is 100% light tight inside by placing a small piece of photo paper into the camera within a changing bag or darkroom. Then bring it back into the light for a few minutes then go to a darkroom and develop. If it's black or has any variations of black/grey there's a light leak and may ruin a photo if you try to take a picture with it. To fix it, just try to find it yourself and cover it up, then try again.
Last, but not least, you place photo paper directly across from the lens and then will need to make a reasonably long exposure. The outcome of a pinhole image will be a negative and to make the positive, you just contact print it using an enlarger within a darkroom; this is why some pinhole images look the opposite of what something really is, which is similar to what the negative does in a film camera. See below:
negative -->
<-- positiveThere are also different techniques with this process as you can experiment with different pinhole sizes, multiple exposures, angles, ghost exposures, etc. Even instead of using paper, you can use films. With recent advancements, it is possible to use pinhole even for digital slr cameras by drilling a hole into the lens cap and making a lengthy exposure. You're limitless in the world of pinhole photography; in fact, you're limitless in the world of photography in general.
Awesome pinhole photography
:thumb6975885:
:thumb17222499: :thumb4825788:
:thumb38361120:
:thumb34974138:
"There is something special about a pinhole camera. There is a beauty in its simplicity and rawness that technology has not been able to better. There is a timeless quality that can make the most uncomplicated subject seem full of poetry.In each pinhole picture I take I hope to capture the joy and excitement that the early pioneering photographers must have felt when they took and developed photographs for the very first time."
-Wolf Howard
Want to learn more?

\update.
NEW dA USERNAME: ~throughHislens (https://www.deviantart.com/throughhislens) (throughHislens (https://www.deviantart.com/throughhislens))
permanent change toward the end of April / beginning of May
Thank you for your cooperation! :heart:
L I F E throughHislens
School is going well! I am officially a Junior now and am taking three classes (History of Photography II, Advanced Survey of Computer Art Applications, and Drawing II). I will be going to New York in June! :excited: Taking a history class where I get to visit all the museums and also take a Photography Seminar class where I get to meet professional photographers and working alumni in the area. I have never been to New York before and it should be quite the e
Transform: zach arias
You just need to watch this video.
Professional, amateur, other.
This relates to everyone.
[http://www.zarias.com/?p=284]
Meet the Millennials
they elected obama and are shaping today's info-culture. but are they really america's next greatest generation?
FLYP is one of the newest advances in multimedia. It presents it is a user-friendly and content-choosing interface. If you want to learn more about a certain thing you click and it will either give you info, a picture, a video, etc.
[http://www.flypmedia.com/issues/24/#1/1]
SCAD To Open Campus In Hong Kong, Fall 2010
SCAD To Open Campus In Hong Kong, Fall 2010
[http://www.scad.edu/hongkong/]
© 2006 - 2024 wrighton363
Comments87
Join the community to add your comment. Already a deviant? Log In
I do thank you for the article, gonna have some fun with my dad here  (Smile)")